Java Native调用
JNI
最朴素的方式,也是JNA的前身。
首先写一个接口java文件,里面包含着native的方法和加载库的方法loadLibrary,例如:
1
2
3
4
5
6
7
8
9
10
11
12
13
14
15
| public class HelloNative
{
static
{
System.loadLibrary("HelloNative");
}
public static native void sayHello();
@SuppressWarnings("static-access")
public static void main(String[] args)
{
new HelloNative().sayHello();
}
}
|
需要注意的是,该文件不能包含任何其他包的调用,因此只能转换原生java类型。
然后调用以下方法生成头文件:
1
| javac -h ./ HelloNative.java
|
具体对应关系可以参考jni和java对应关系。
头文件中引用了java包的头文件jni.h和jni_md.h。此文件位置在/usr/lib/jvm/java-{1.8.0}-openjdk-amd64/include和/usr/lib/jvm/java-{1.8.0}-openjdk-amd64/include/linux其中{1.8.0}是Java发行版本(此处使用apt方式安装java)。
根据头文件编写c代码,使用以下语句完成编译:
1
| gcc -m64 -W -I"/usr/lib/jvm/java-1.8.0-openjdk-amd64/include" -I"/usr/lib/jvm/java-1.8.0-openjdk-amd64/include/linux" -shared -o libHelloNative.so ./HelloNative.cpp
|
完成之后生成libHelloNative.so文件。注意java中例如加载名为HelloNative的库文件实际加载的是libHelloNative.so文件。
之后直接将生成的文件与java代码放在一起,调用java HelloNative.java即可。
JNA
JNA是sun公司对JNI进行的封装。好处是不需要进行类型转换,直接将java对象转化为c原生类型。但是其不具备c代码调用java代码的能力。由于需要加载依赖,因此比较适合创建maven项目管理。
Maven for JNA
父项目
首先需要创建一个父项目,分别用于构建java与原生代码。根目录下只需要两个文件夹和一个pom.xml文件。
1
2
3
4
5
6
7
8
9
10
11
12
13
14
| <?xml version="1.0" encoding="UTF-8"?>
<project xmlns:xsi="http://www.w3.org/2001/XMLSchema-instance"
xmlns="http://maven.apache.org/POM/4.0.0"
xsi:schemaLocation="http://maven.apache.org/POM/4.0.0 http://maven.apache.org/xsd/maven-4.0.0.xsd">
<modelVersion>4.0.0</modelVersion>
<groupId>com.app.shared_memory</groupId>
<artifactId>shared_memory</artifactId>
<version>1.0-SNAPSHOT</version>
<packaging>pom</packaging>
<modules>
<module>native</module>
<module>jni</module>
</modules>
</project>
|
然后创建与两个子模块同名的文件夹native与jni。对于每个文件夹下,即是一个完整的maven项目。可以使用
1
| mvn archetype:generate -DgroupId=com.fzclass.helloworld -DartifactId=helloworld -Dpackag=com.fzclass.helloworld -Dversion=1.0-SNAPSHOT
|
也可以使用vscode插件Extension Pack for Java然后使用java: Create Java Project创建。
Native项目
该项目pom.xml实例如下:
1
2
3
4
5
6
7
8
9
10
11
12
13
14
15
16
17
18
19
20
21
22
23
24
25
26
27
28
29
30
31
32
33
34
35
36
37
38
39
40
41
42
43
44
45
46
47
48
49
50
51
52
53
54
55
56
57
58
59
60
| <?xml version="1.0" encoding="UTF-8"?>
<project xmlns="http://maven.apache.org/POM/4.0.0"
xmlns:xsi="http://www.w3.org/2001/XMLSchema-instance"
xsi:schemaLocation="http://maven.apache.org/POM/4.0.0 http://maven.apache.org/xsd/maven-4.0.0.xsd">
<modelVersion>4.0.0</modelVersion>
<parent>
<groupId>com.app.shared_memory</groupId>
<artifactId>shared_memory</artifactId>
<version>1.0-SNAPSHOT</version>
</parent>
<artifactId>shared_memory_native</artifactId>
<packaging>so</packaging>
<build>
<plugins>
<plugin>
<artifactId>maven-compiler-plugin</artifactId>
</plugin>
<plugin>
<groupId>org.codehaus.mojo</groupId>
<artifactId>native-maven-plugin</artifactId>
<version>1.0-alpha-8</version>
<extensions>true</extensions>
<configuration>
<compilerProvider>generic-classic</compilerProvider>
<compilerExecutable>g++</compilerExecutable>
<linkerExecutable>g++</linkerExecutable>
<sources>
<source>
<directory>${basedir}/src/main/cpp/jni</directory>
<fileNames>
<fileName>SharedMemory.cpp</fileName>
</fileNames>
</source>
</sources>
<compilerStartOptions>
<compilerStartOption>-I"/usr/lib/jvm/java-1.8.0-openjdk-amd64/include/"</compilerStartOption>
<compilerStartOption>
-I"/usr/lib/jvm/java-1.8.0-openjdk-amd64/include/linux/"</compilerStartOption>
</compilerStartOptions>
<compilerEndOptions>
<compilerEndOption>-shared</compilerEndOption>
<compilerEndOption>-fPIC</compilerEndOption>
</compilerEndOptions>
<linkerStartOptions>
<linkerStartOption>-I"/usr/lib/jvm/java-1.8.0-openjdk-amd64/include/"</linkerStartOption>
<linkerStartOption>-I"/usr/lib/jvm/java-1.8.0-openjdk-amd64/include/linux/"</linkerStartOption>
</linkerStartOptions>
<linkerEndOptions>
<linkerEndOption>-shared</linkerEndOption>
<linkerEndOption>-fPIC</linkerEndOption>
</linkerEndOptions>
</configuration>
</plugin>
</plugins>
</build>
</project>
|
其中使用parent指示父项目,然后使用native-maven-plugin完成编译。分别指定源文件和编译与链接时的参数,这里需要指定引用java的头文件位置,类似之前提到的JNI方式。linkerFinalName默认为{artifactId}.so。
在原生文件下,只需要实现对应函数调用即可,对应关系可以参考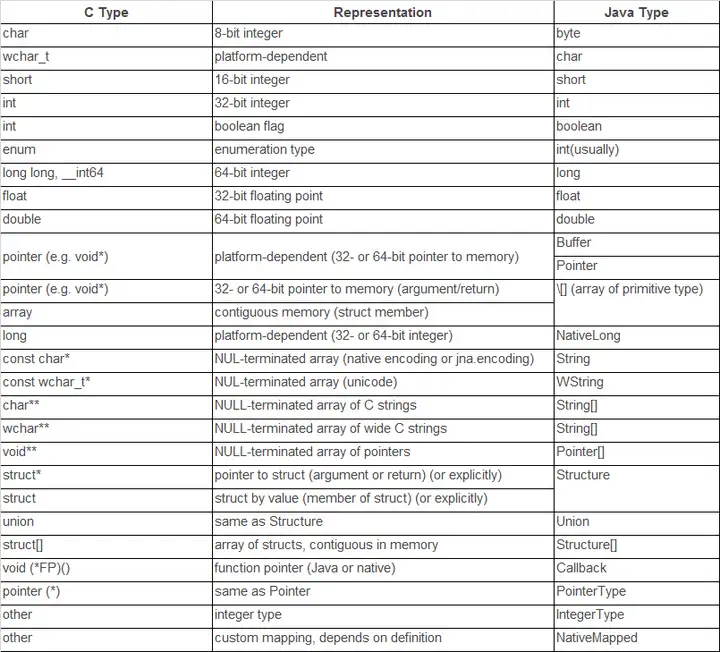
java项目
pom.xml可以参考
1
2
3
4
5
6
7
8
9
10
11
12
13
14
15
16
17
18
19
20
21
22
23
24
25
26
27
28
29
30
31
32
33
34
35
36
37
38
39
40
41
42
43
44
45
46
47
48
49
50
51
52
53
54
55
56
57
58
59
60
61
62
63
64
65
66
67
68
69
70
71
72
73
74
75
76
77
78
79
80
81
82
83
84
85
86
87
88
89
90
91
92
93
94
95
96
97
98
99
100
101
102
103
104
105
106
107
108
109
110
111
112
113
114
115
| <?xml version="1.0" encoding="UTF-8"?>
<project xmlns="http://maven.apache.org/POM/4.0.0"
xmlns:xsi="http://www.w3.org/2001/XMLSchema-instance"
xsi:schemaLocation="http://maven.apache.org/POM/4.0.0 http://maven.apache.org/xsd/maven-4.0.0.xsd">
<modelVersion>4.0.0</modelVersion>
<parent>
<groupId>com.app.shared_memory</groupId>
<artifactId>shared_memory</artifactId>
<version>1.0-SNAPSHOT</version>
</parent>
<artifactId>shared_memory_jni</artifactId>
<packaging>jar</packaging>
<name>shared_memory_jni</name>
<url>http://www.example.com</url>
<properties>
<project.build.sourceEncoding>UTF-8</project.build.sourceEncoding>
<maven.compiler.source>1.7</maven.compiler.source>
<maven.compiler.target>1.7</maven.compiler.target>
</properties>
<dependencies>
<dependency>
<groupId>junit</groupId>
<artifactId>junit</artifactId>
<version>4.11</version>
<scope>test</scope>
</dependency>
<dependency>
<groupId>net.java.dev.jna</groupId>
<artifactId>jna</artifactId>
<version>4.1.0</version>
</dependency>
</dependencies>
<build>
<plugins>
<plugin>
<groupId>org.apache.maven.plugins</groupId>
<artifactId>maven-assembly-plugin</artifactId>
<configuration>
<descriptorRefs>
<descriptorRef>jar-with-dependencies</descriptorRef>
</descriptorRefs>
<archive>
<manifest>
<mainClass>com.app.shared_memory.SharedMemory</mainClass>
</manifest>
</archive>
</configuration>
<executions>
<execution>
<id>make-assembly</id>
<phase>package</phase>
<goals>
<goal>single</goal>
</goals>
</execution>
</executions>
</plugin>
<plugin>
<groupId>org.apache.maven.plugins</groupId>
<artifactId>maven-surefire-plugin</artifactId>
<version>2.7</version>
<configuration>
<systemPropertyVariables>
<java.library.path>${project.build.directory}/classes</java.library.path>
</systemPropertyVariables>
</configuration>
</plugin>
<plugin>
<groupId>org.apache.maven.plugins</groupId>
<artifactId>maven-dependency-plugin</artifactId>
<version>2.10</version>
<executions>
<execution>
<id>copy</id>
<phase>compile</phase>
<goals>
<goal>copy</goal>
</goals>
</execution>
</executions>
<configuration>
<artifactItems>
<artifactItem>
<groupId>com.app.shared_memory</groupId>
<artifactId>shared_memory_native</artifactId>
<version>1.0-SNAPSHOT</version>
<type>so</type>
<overWrite>true</overWrite>
<outputDirectory>${project.build.directory}/classes</outputDirectory>
<destFileName>libSharedMemory.so</destFileName>
</artifactItem>
</artifactItems>
</configuration>
</plugin>
</plugins>
</build>
</project>
|
其中使用parent指示父项目,加入jna依赖。
使用maven-assembly-plugin完成打包jar文件,替换掉默认的maven-jar-plugin工具,这样可以将依赖打入jar包。mainClass指示主类,phase指示其附加到maven生命周期的package。使用maven-surefire-plugin将测试时的java lib替换为java.library.path指示的位置。maven-dependency-plugin附加到compile生命周期,goal指示完成复制操作,将native生成的文件复制到destFileName字段。复制到classes下的好处是,在package时段内会将其打入jar包。
在java文件中写接口和导入:
1
2
3
4
5
6
7
8
9
10
11
12
| public interface LibrarySharedMemory extends Library {
int alloc();
Pointer link(int id);
int write(Pointer addr, String str, int len);
String read(Pointer addr, int len);
}
LibrarySharedMemory LIBRARY_SHARED_MEMORY = (LibrarySharedMemory) Native.loadLibrary(extractLibrary(),
LibrarySharedMemory.class);
|
为了将jar包中的位置转为绝对路径,首先将其复制到tmp目录下,并获取绝对路径,然后加载它。
1
2
3
4
5
6
7
8
9
10
11
12
13
14
15
16
17
| private String extractLibrary() {
try {
File file = File.createTempFile("libSharedMemory", ".so");
if (file.exists()) {
InputStream link = (getClass().getResourceAsStream("/libSharedMemory.so"));
Files.copy(
link,
file.getAbsoluteFile().toPath(),
java.nio.file.StandardCopyOption.REPLACE_EXISTING);
return file.getAbsoluteFile().toPath().toString();
}
return null;
} catch (IOException e) {
e.printStackTrace();
return null;
}
}
|
执行
在顶层(父项目)中,执行mvn package即可完成打包,然后进入jni/target,执行java -jar {shared_memory_jni-1.0-SNAPSHOT-jar-with-dependencies.jar},其中{shared_memory_jni-1.0-SNAPSHOT-jar-with-dependencies.jar}是文件名,即可执行。如果在java子项目中使用了packageManagement,则必须使用mvn package assembly:single才可以调用。
共享内存
Java只支持mmap方式共享内存,需要使用JNI方式使用c来完成。可以参考Linux进程间通信(六):共享内存 shmget()、shmat()、shmdt()、shmctl()
参考
使用Maven构建发布JNI项目
