1. 前置条件 1.1 配置本地存储 # local path-provisioner # https://github.com/rancher/local-path-provisioner
wget https://raw.githubusercontent.com/rancher/local-path-provisioner/v0.0.29/deploy/local-path-storage.yaml
sed -i 's#/opt/local-path-provisioner#/opt/k8s-local-path-storage#g'
crictl pull dhub.kubesre.xyz/rancher/local-path-provisioner:v0.0.29
ctr -n k8s.io i tag dhub.kubesre.xyz/rancher/local-path-provisioner:v0.0.29 docker.io/rancher/local-path-provisioner:v0.0.29
k apply -f local-path-storage.yaml
1.2 开启特性门控 # 开启StatefulSetAutoDeletePVC特性门控
# 此门控在1.27已经默认启用
sudo vim /etc/kubernetes/manifests/kube-controller-manager.yaml
# 添加参数
- --feature-gates=StatefulSetAutoDeletePVC=true
# 关闭保存后kube-controller-manager会自动重新加载
2. 安装依赖 1 sudo apt install -y qemu-kvm libvirt-daemon-system libvirt-clients bridge-utils virt-manager
直接使用qemu
1
2
3
4
5
6
# 手动下载iso wget http://old-releases.ubuntu.com/releases/groovy/ubuntu-20.10-desktop-amd64.iso # 创建空硬盘 qemu-img create -f qcow2 test-vm-2.qcow2 10G # 安装系统 qemu-system-x86_64 -m 2048 -smp 2 --enable-kvm test-vm-2.qcow2 -cdrom ubuntu-20.04.4-desktop-amd64.iso
3. 检查是否支持虚拟化
4. 安装kubevirt 1 2 3 4 5 6 7 8 9 10 11 12 13 14 15 16 17 18 19 20 21 22 23 24 25 26 27 28 29 30 31 32 33 34 35 36 37 38 39 # 安装kubevirt export RELEASE=v1.3.1 kubectl apply -f https://github.com/kubevirt/kubevirt/releases/download/${RELEASE}/kubevirt-operator.yaml kubectl apply -f https://github.com/kubevirt/kubevirt/releases/download/${RELEASE}/kubevirt-cr.yaml # 等待所有 KubeVirt 组件都启动 kubectl -n kubevirt wait kv kubevirt --for condition=Available # 下载 virtctl client wget https://github.com/kubevirt/kubevirt/releases/download/${RELEASE}/virtctl-${RELEASE}-linux-amd64 mv virtctl-${RELEASE}-linux-amd64 /usr/local/bin/virtctl chmod +x /usr/local/bin/virtctl # 安装CDI:用于将pvc转换为虚拟机的磁盘 export RELEASE=v1.60.3 kubectl create -f https://github.com/kubevirt/containerized-data-importer/releases/download/$RELEASE/cdi-operator.yaml kubectl create -f https://github.com/kubevirt/containerized-data-importer/releases/download/$RELEASE/cdi-cr.yaml # 启用featureGates vim enable-feature-gate.yaml # 写入如下内容 apiVersion: kubevirt.io/v1 kind: KubeVirt metadata: name: kubevirt namespace: kubevirt spec: configuration: vmRolloutStrategy: "LiveUpdate" developerConfiguration: featureGates: - ExpandDisks - HotplugVolumes - VMLiveUpdateFeatures workloadUpdateStrategy: workloadUpdateMethods: - LiveMigrate # 应用更改 kubectl apply -f enable-feature-gate.yaml
5. 编写部署helm文件 5.1 ubuntu虚拟机 1 2 3 4 5 6 7 8 9 10 11 12 13 14 15 16 17 18 19 20 21 22 23 24 25 26 27 28 29 30 31 32 33 34 35 36 37 38 39 40 41 42 43 44 45 46 47 48 49 50 51 52 53 54 55 56 57 58 59 60 61 62 63 64 65 66 67 68 69 70 71 72 73 74 75 76 77 78 79 80 81 82 83 84 85 86 87 88 89 90 91 92 93 94 95 96 97 98 99 100 101 102 103 104 105 106 107 108 109 110 111 112 113 114 115 116 117 118 119 120 121 122 123 124 125 126 127 128 129 130 131 132 133 134 135 136 137 138 139 140 141 142 143 144 145 146 147 148 149 150 151 152 153 154 155 156 157 158 159 160 161 162 163 164 165 {{ include "ubuntu.fullname" . }} is deployed! Before start, you must wait it start successfully. You can run `kubectl get dv | grep {{ include "ubuntu.fullname" . }}` to check if the image has been pulled. You can run `virtctl console {{ include "ubuntu.fullname" . }}` to connect to it. You can type ctrl+] to exit console. The username is {{ .Values.software.user }} and password is {{ .Values.software.password }}. {{- if .Values.software.desktop.enabled }} Please wait the desktop environment installed, then you can run `virtctl vnc {{ include "ubuntu.fullname" . }}` to connect to it. You can see `/var/log/cloud-init-output.log` to see the progress of installing. {{- end }} Have a happy coding in {{ include "ubuntu.fullname" . }}! apiVersion: cdi.kubevirt.io/v1beta1 kind: DataVolume metadata: name: {{ include "ubuntu.fullname" . }} spec: pvc: accessModes: - ReadWriteOnce resources: requests: storage: {{ .Values.hardware.storage }} storageClassName: local-path source: http: {{- if eq .Values.software.customImageUrl "" }} url: "https://cloud-images.ubuntu.com/{{ .Values.software.ubuntuVersion }} /current/{{ .Values.software.ubuntuVersion }} -server-cloudimg-amd64.img" {{- else }} url: {{ .Values.software.customImageUrl }} {{- end }} apiVersion: v1 kind: Secret metadata: name: {{ include "ubuntu.fullname" . }}-cloudinit-nocloud type: Opaque stringData: userdata: |- #cloud-config user: "{{ .Values.software.user }}" password: "{{ .Values.software.password }}" chpasswd: { expire: False } ssh_pwauth: True {{- if .Values.software.sshConfig.enabled }} write_files: - path: /home/root/ssh/{{ .Values.software.sshConfig.idFile }} content: | {{- .Values.software.sshConfig.idFileContent | nindent 18 }} - path: /home/root/ssh/{{ .Values.software.sshConfig.idFile }}.pub content: | {{- .Values.software.sshConfig.idFilePubContent | nindent 18 }} {{- end }} runcmd: - sed -i s@/archive.ubuntu.com/@/mirrors.tuna.tsinghua.edu.cn/@g /etc/apt/sources.list - sh -c '[ -f /etc/apt/sources.list.d/ubuntu.sources ] && sed -i -E "s|http://archive\.ubuntu\.com/ubuntu/?|http://cn.archive.ubuntu.com/ubuntu/|g" /etc/apt/sources.list.d/ubuntu.sources' - apt-get update - apt-get install zsh -y - wget https://gitee.com/mirrors/oh-my-zsh/raw/master/tools/install.sh - sed -i 's/REPO=\${REPO:-ohmyzsh\/ohmyzsh}/REPO=\${REPO:-mirrors\/oh-my-zsh}/g' install.sh - sed -i 's/REMOTE=\${REMOTE:-https:\/\/github.com\/\${REPO}.git}/REMOTE=\${REMOTE:-https:\/\/gitee.com\/\${REPO}.git}/g' install.sh - sed -i 's/USER=\${USER:-\$(id -u -n)}/USER={{ .Values.software.user }}/' install.sh - bash install.sh - rm install.sh - sed -i 's/ZSH_THEME="robbyrussell"/ZSH_THEME="ys"/g' /home/{{ .Values.software.user }}/.zshrc - sed -i 's/plugins=(git)/plugins=(git zsh-syntax-highlighting zsh-autosuggestions)/g' /home/{{ .Values.software.user }}/.zshrc - git clone https://gitee.com/mirrors/zsh-syntax-highlighting.git /home/{{ .Values.software.user }}/.oh-my-zsh/custom/plugins/zsh-syntax-highlighting - git clone https://gitee.com/mirrors/zsh-autosuggestions.git /home/{{ .Values.software.user }}/.oh-my-zsh/custom/plugins/zsh-autosuggestions - echo "exec -l zsh" >> /home/{{ .Values.software.user }}/.bashrc {{- if .Values.software.sshConfig.enabled }} - cp /home/root/ssh/{{ .Values.software.sshConfig.idFile }} /home/{{ .Values.software.user }}/.ssh/{{ .Values.software.sshConfig.idFile }} - cp /home/root/ssh/{{ .Values.software.sshConfig.idFile }}.pub /home/{{ .Values.software.user }}/.ssh/{{ .Values.software.sshConfig.idFile }}.pub - rm -rf /home/root/ssh - chown {{ .Values.software.user }}:{{ .Values.software.user }} /home/{{ .Values.software.user }}/.ssh/* - chmod 0600 /home/{{ .Values.software.user }}/.ssh/* {{- end }} {{- if .Values.software.desktop.enabled }} {{- if .Values.software.desktop.fullInstalled }} - DEBIAN_FRONTEND=noninteractive apt-get install ubuntu-desktop -y {{- else }} - DEBIAN_FRONTEND=noninteractive apt-get install ubuntu-desktop-minimal -y {{- end }} - DEBIAN_FRONTEND=noninteractive apt-get install lightdm debconf-utils -y - DEBIAN_FRONTEND=noninteractive apt-get remove gdm3 -y - DEBIAN_FRONTEND=noninteractive dpkg-reconfigure lightdm - service lightdm start - cat /etc/X11/default-display-manager {{- end }} - echo "Cloud init done." apiVersion: kubevirt.io/v1 kind: VirtualMachine metadata: labels: kubevirt.io/os: linux name: {{ include "ubuntu.fullname" . }} spec: running: true template: metadata: labels: kubevirt.io/domain: {{ include "ubuntu.fullname" . }} spec: domain: devices: disks: - disk: bus: virtio name: disk0 - disk: bus: virtio readonly: true name: cloudinitdisk machine: type: "" resources: requests: cpu: {{ .Values.hardware.cpu }} memory: {{ .Values.hardware.memory }} terminationGracePeriodSeconds: 0 volumes: - name: disk0 persistentVolumeClaim: claimName: {{ include "ubuntu.fullname" . }} - cloudInitNoCloud: secretRef: name: {{ include "ubuntu.fullname" . }}-cloudinit-nocloud name: cloudinitdisk hardware: storage: 40Gi cpu: 4 memory: 8096M software: user: ethereal password: "020402" ubuntuVersion: jammy customImageUrl: "" desktop: enabled: false fullInstalled: false sshConfig: enabled: false idFile: id_ed25519 idFileContent: | <私钥> idFilePubContent: ssh-ed25519 AAAAC3NzaC1lZDI1NTE5AAAAID7HfYBgf1NssgJHQzmdsMaABb+qAtHRULU3p/91sQWd ethereal@Ethereal-Desktop
5.2 windows虚拟机 5.2.1 选择镜像
5.2.2 将镜像上传到pvc中 注意,不能使用storage-class。有以下问题:
因此只能采用官方推荐的使用virtctl上传镜像的方式。
Containerized Data Importer - KubeVirt user guide
先创建好用于存放最终的镜像的本地pv
1
2
3
4
5
6
7
8
9
10
11
12
13
14
apiVersion: v1 kind: PersistentVolume metadata: name: image-tinywin11-pv labels: type: local spec: storageClassName: "" capacity: storage: 6Gi accessModes: - ReadWriteOnce hostPath: path: "/opt/k8s-local-path-storage/hostpath/image-tinywin11-pv"
还需要创建一个用于helper-pod临时存放数据的pv
1
2
3
4
5
6
7
8
9
10
11
12
13
14
apiVersion: v1 kind: PersistentVolume metadata: name: image-tinywin11-pv-scratch labels: type: local spec: storageClassName: "" capacity: storage: 6Gi accessModes: - ReadWriteOnce hostPath: path: "/tmp/image-tinywin11-pv-scratch"
将cdi-uploadproxy暴露
1 kubectl port-forward -n cdi svc/cdi-uploadproxy 8443:443
利用cdi-uploadproxy上传镜像
1 virtctl image-upload pvc image-tinywin11-pvc --size 6Gi --image-path=/home/ethereal/Downloads/tiny1123H2x64.iso --insecure --uploadproxy-url=https://127.0.0.1:8443
5.2.3 下载额外镜像 镜像来源可以参考quay.io/kubevirt/virtio-container-disk:20241121_a95b4f95ec - 镜像下载 | quay.io
1
2
3
4
5
sudo crictl pull swr.cn-north-4.myhuaweicloud.com/ddn-k8s/quay.io/kubevirt/virtio-container-disk:20241121_a95b4f95ec sudo ctr -n k8s.io images tag \ swr.cn-north-4.myhuaweicloud.com/ddn-k8s/quay.io/kubevirt/virtio-container-disk:20241121_a95b4f95ec \ docker.io/kubevirt/virtio-container-disk:latest
5.2.4 编写部署helm文件 1 2 3 4 5 6 7 8 9 10 11 12 13 14 15 16 17 18 19 20 21 22 23 24 25 26 27 28 29 30 31 32 33 34 35 36 37 38 39 40 41 42 43 44 45 46 47 48 49 50 51 52 53 54 55 56 57 58 59 60 61 62 63 64 65 66 67 68 69 70 71 72 73 74 75 76 77 78 79 80 81 82 83 84 85 86 87 88 89 90 91 92 93 {{ include "windows.fullname" . }} is deployed! Before start, you must wait it start successfully. You can run `kubectl get dv | grep {{ include "windows.fullname" . }}` to check if the image has been pulled. You can run `virtctl console {{ include "windows.fullname" . }}` to connect to it. You can type ctrl+] to exit console. Have a happy coding in {{ include "windows.fullname" . }}! apiVersion: cdi.kubevirt.io/v1beta1 kind: DataVolume metadata: name: {{ include "windows.fullname" . }} spec: pvc: accessModes: - ReadWriteOnce resources: requests: storage: {{ .Values.hardware.storage }} storageClassName: local-path source: blank: {} apiVersion: kubevirt.io/v1 kind: VirtualMachine metadata: labels: kubevirt.io/os: linux name: {{ include "windows.fullname" . }} spec: running: true template: metadata: labels: kubevirt.io/domain: {{ include "windows.fullname" . }} spec: domain: devices: disks: - disk: bus: sata name: disk0 - bootOrder: 1 cdrom: bus: sata name: winiso - cdrom: bus: sata name: virtio interfaces: - masquerade: {} model: e1000 name: default machine: type: "" resources: requests: cpu: {{ .Values.hardware.cpu }} memory: {{ .Values.hardware.memory }} terminationGracePeriodSeconds: 0 networks: - name: default pod: {} volumes: - name: disk0 persistentVolumeClaim: claimName: {{ include "windows.fullname" . }} - name: winiso persistentVolumeClaim: claimName: {{ .Values.software.imagePvc }} - containerDisk: image: {{ .Values.software.containerDiskImage }} name: virtio hardware: storage: 40Gi cpu: 4 memory: 4096M software: imagePvc: image-tinywin11-pvc containerDiskImage: swr.cn-north-4.myhuaweicloud.com/ddn-k8s/quay.io/kubevirt/virtio-container-disk:20241121_a95b4f95ec
值得注意的是,以上网络必须包含interface和network,必须包含containerDisk用于加载驱动,必须设置cd为启动优先级1,必须设置安装硬盘为sata总线。
5.2.5 启动 启动后,其将会进入安装。需要手动加载驱动。加载好后直接安装即可。
6. 附加额外内容 可以附加硬盘
1 2 3 4 5 6 7 8 9 10 11 12 13 14 15 16 17 18 19 20 21 22 23 24 25 26 27 28 29 30 31 hardware: storage: 20Gi apiVersion: cdi.kubevirt.io/v1beta1 kind: DataVolume metadata: name: {{ include "addvolume.fullname" . }} spec: pvc: accessModes: - ReadWriteOnce resources: requests: storage: {{ .Values.hardware.storage }} storageClassName: local-path source: blank: {} {{ include "addvolume.fullname" . }} is deployed! You can run `kubectl get dv | grep {{ include "addvolume.fullname" . }}` to check the dv status. You can attach it to a vm by `virtctl addvolume vm_name --volume-name={{ include "addvolume.fullname" . }} --persist`
可以使用如下方法附加
1
2
helm install ubuntu-vm-2204-vm2 ~/Softwares/k8s-help-tools/vm/addvolume virtctl addvolume ubuntu-vm-2204 --volume-name=ubuntu-vm-2204-vm2 --persist
可以使用如下方法修改cpu和内存
1
2
3
4
5
6
# 停止虚拟机 virtctl stop ubuntu-vm-2204 # 修改cpu或内存配置 vim values.yaml # 更新 helm upgrade ubuntu-vm-2204 ~/Softwares/k8s-help-tools/vm/myubuntu --set software.ubuntuVersion=jammy --set software.desktop.enabled=true --set software.sshConfig.enabled=true
7. 特殊情况 当vm关机后开启时,网卡无法启动,原因是netplan中指定了网卡的mac地址,而mac地址在关机开机后发生改变
首先进入文件夹/etc/netplan/,发现其中文件(50-cloud-init.yaml)内容为:
1 2 3 4 5 6 7 8 9 10 11 12 13 14 network: ethernets: enp1s0: dhcp4: true dhcp6: true match: macaddress: b2:6a:f3:79:c0:47 set-name: enp1s0 version: 2
其中指明了mac地址。
因此只需要将mac地址修改为ip a所显示的mac地址,保存后使用命令sudo netplan apply部署即可。
8. 救砖 通过管理文件即可救砖。
1
2
3
4
5
6
7
8
9
## 通过外带的机器挂载镜像 virt-rescue -a CentOS_8_Server.img -i ## 修改密码 virt-sysprep -d 21admin --firstboot-command ‘dpkg-reconfigure openssh-server’ --password ubuntu:password:123456 --root-password password:123456 ## 工具安装 apt/yum install libguestfs-tools systemctl start libvirtd ## 详细信息 virt-sysprep -v -x ...
9. kube-ovn kube-ovn是kubevirt的最佳组合,同时,kube-ovn支持通过chaining模式与cilium结合,使得同时具备高性能和易用性。
9.0 可选:删除之前的cni 1 2 3 4 5 6 7 8 9 10 11 12 # master cilium uninstall # all nodes ip a | grep cili | awk -F '{print $2}' | awk -F '@' '{print $1}' | xargs -i ip link del {} ip link del kube-ipvs0 rm -f /etc/cni/net.d/* systemctl restart kubelet systemctl restart network sudo reboot # 重启机器可以删干净规则
9.1 搭建kube-ovn 1 2 3 4 5 6 7 8 9 10 11 12 13 14 15 16 17 18 19 20 21 22 23 24 25 26 27 28 29 30 31 32 33 34 35 36 37 38 39 40 41 42 43 44 # kube-ovn wget https://github.com/kubeovn/kube-ovn/releases/download/v1.13.5/kube-ovn-v1.13.5.tgz tar xvf kube-ovn-v1.13.5.tgz # 给节点添加标签 kubectl label node -lbeta.kubernetes.io/os=linux kubernetes.io/os=linux --overwrite kubectl label node -lnode-role.kubernetes.io/control-plane kube-ovn/role=master --overwrite # 更改helm文件 MASTER_NODES: "192.168.29.100" ipv4: POD_CIDR: "10.244.0.0/16" POD_GATEWAY: "10.244.0.1" SVC_CIDR: "10.96.0.0/12" JOIN_CIDR: "100.64.0.0/16" PINGER_EXTERNAL_ADDRESS: "1.1.1.1" PINGER_EXTERNAL_DOMAIN: "kube-ovn.io." ipv6: POD_CIDR: "fd00:10:244::/112" POD_GATEWAY: "fd00:10:244::1" SVC_CIDR: "fd00:10:96::/112" JOIN_CIDR: "fd00:100:64::/112" PINGER_EXTERNAL_ADDRESS: "2606:4700:4700::1111" PINGER_EXTERNAL_DOMAIN: "google.com." dual_stack: POD_CIDR: "10.244.0.0/16,fd00:10:244::/112" POD_GATEWAY: "10.244.0.1,fd00:10:244::1" SVC_CIDR: "10.96.0.0/12,fd00:10:96::/112" JOIN_CIDR: "100.64.0.0/16,fd00:100:64::/112" PINGER_EXTERNAL_ADDRESS: "1.1.1.1,2606:4700:4700::1111" PINGER_EXTERNAL_DOMAIN: "google.com." # 如果需要结合cilium,还需要修改 func: ENABLE_NP: false cni_conf: CNI_CONFIG_PRIORITY: "10" # 部署 helm install kube-ovn ./
9.2 结合cilium 删除之前的安装
调整kube-ovn的配置
1 2 3 4 func: ENABLE_NP: false cni_conf: CNI_CONFIG_PRIORITY: "10"
每个节点调整cni优先级
1 mv /etc/cni/net.d/01-kube-ovn.conflist /etc/cni/net.d/10-kube-ovn.conflist
创建chaining.yaml
1 2 3 4 5 6 7 8 9 10 11 12 13 14 15 16 17 18 19 20 21 22 23 24 25 26 27 28 29 30 31 apiVersion: v1 kind: ConfigMap metadata: name: cni-configuration namespace: kube-system data: cni-config: |- { "name": "generic-veth", "cniVersion": "0.3.1", "plugins": [ { "type": "kube-ovn", "server_socket": "/run/openvswitch/kube-ovn-daemon.sock", "ipam": { "type": "kube-ovn", "server_socket": "/run/openvswitch/kube-ovn-daemon.sock" } }, { "type": "portmap", "snat": true, "capabilities": {"portMappings": true} }, { "type": "cilium-cni" } ] }
安装chaining文件
1 kubectl apply -f chaining.yaml
重新部署cilium
1 2 3 # 注意下列CIDR要和上面kube-ovn安装时候的保持一致 helm repo add cilium https://helm.cilium.io/ helm install cilium cilium/cilium --wait --version 1.16.1 --namespace kube-system --set operator.replicas=1 --set socketLB.enabled=true --set nodePort.enabled=true --set externalIPs.enabled=true --set hostPort.enabled=false --set routingMode=native --set sessionAffinity=true --set enableIPv4Masquerade=false --set enableIPv6Masquerade=false --set hubble.enabled=true --set sctp.enabled=true --set ipv4.enabled=true --set ipv6.enabled=false --set ipam.mode=cluster-pool --set-json ipam.operator.clusterPoolIPv4PodCIDRList='["100.65.0.0/16"]' --set-json ipam.operator.clusterPoolIPv6PodCIDRList='["fd00:100:65::/112"]' --set cni.chainingMode=generic-veth --set cni.chainingTarget=kube-ovn --set cni.customConf=true --set cni.configMap=cni-configuration
查看部署状态,可以看到有多少pod正在被管理
重启机器,更新ip link
重启所有pod
1 kubectl delete pods --all -n <namespace>
如果前后服务的cidr一致,那么则不需要重新安装服务。
9.3 安装插件 1 2 3 4 5 6 7 8 9 10 # 下载插件 wget https://raw.githubusercontent.com/kubeovn/kube-ovn/release-1.10/dist/images/kubectl-ko # 复制到运行目录 cp kubectl-ko /usr/local/bin/kubectl-ko # 添加执行权限 chmod +x /usr/local/bin/kubectl-ko # 检查是否可以正常使用 kubectl plugin list # 示例命令 kubectl ko nb status
命令参考kubectl 插件使用 - Kube-OVN 文档
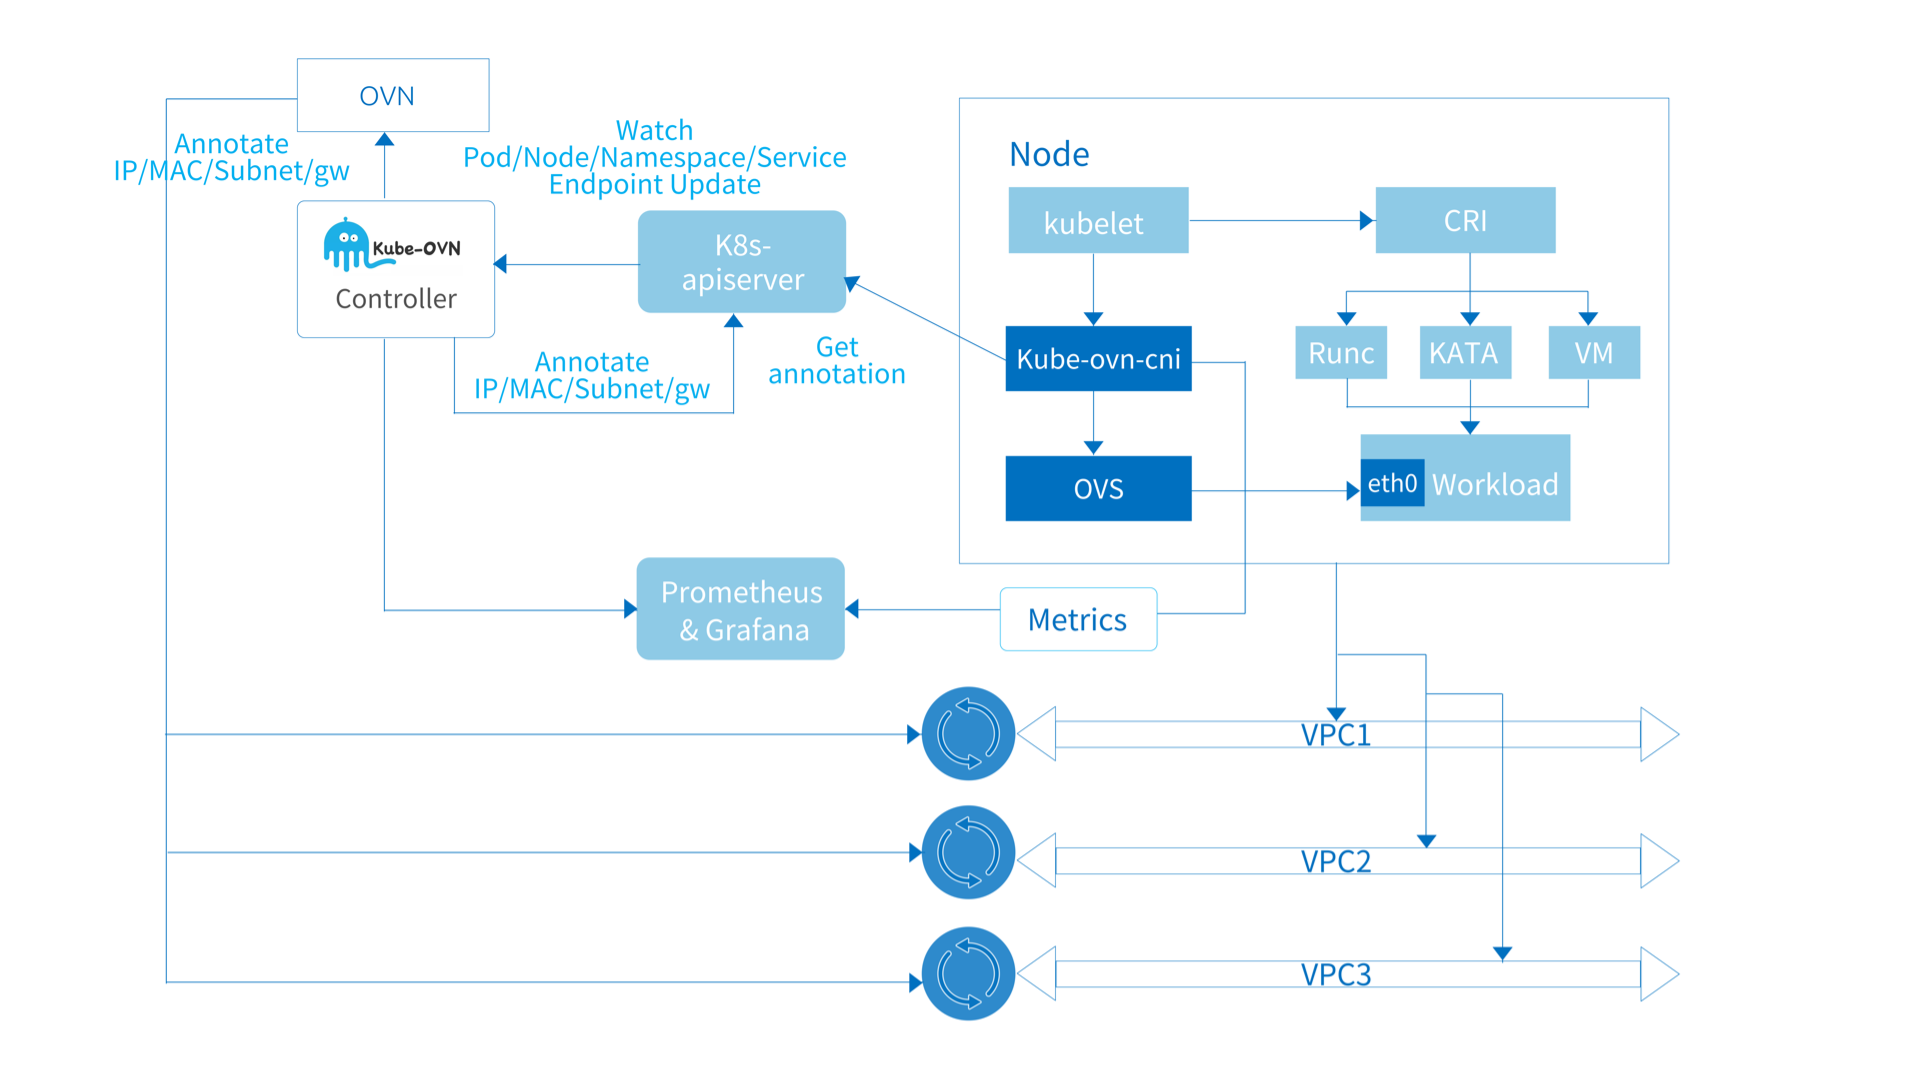
10. 架构 10.1 kube-ovn架构 10.1.1 来自上游:ovn-central 运行 OVN 的管理平面组件,包括 ovn-nb, ovn-sb, 和 ovn-northd。北向数据库持有的是物理抽象,例如路由器、网桥等;南向数据库持有的是流表,可以通过以下命令查看:
1 2 kubectl ko nbctl list Logical_Switch kubectl ko sbctl list Logical_Flow
多个 ovn-central 实例会通过 Raft 协议同步数据保证高可用。
10.1.2 来自上游:ovs-ovn 以 DaemonSet 形式运行在每个节点,在 Pod 内运行了 openvswitch, ovsdb, 和 ovn-controller。这些组件作为 ovn-central 的 Agent 将逻辑流表翻译成真实的网络配置。类似于cilium中的cilium组件。当与cilium链式配合时,改用cilium创建与控制将逻辑流表翻译成真实的网络配置。
主要是用于service层,也就是说从pod网络到其他pod网络的连通性。
10.1.3 核心控制器:kube-ovn-controller 监听k8s组件所有和网络功能相关资源的事件,并根据资源变化情况更新 OVN 内的逻辑网络。也就是说,将k8s的网络逻辑翻译成ovn的网络逻辑,写入北向数据库
10.1.4 核心控制器:kube-ovn-cni 运行在每个节点上,实现 CNI 接口,并操作本地的 OVS 配置单机网络。
主要是负责部署从pod的clusterIP连接到pod的网络
10.1.5 扩展组件:kube-ovn-speaker 对外发布pod的clusterIP,使得能够在本地访问
10.1.6 扩展组件:kube-ovn-pinger 运行在每个节点上收集 OVS 运行信息,节点网络质量,网络延迟等信息。
10.1.7 扩展组件:kube-ovn-monitor 收集 OVN 的运行信息。
10.1.8 例子 举一个创建 Pod 的例子,Pod 下发到 apiserver 后 kube-ovn-controller 会 watch 的新生成了一个 Pod,然后调用 ovn-nb 的接口去创建一个虚拟交换机接口,成功后将 OVN 分配的 IP、Mac、GW 等信息反写到这个 Pod 的 Annotation 中。接下来 kubelet 创建 Pod 时会调用 kube-ovn-cni,kube-ovn-cni 将信息传递给 kube-ovn-cniserver。CNIServer 会反查 Pod 的 Annotation 获得具体的 IP 和 Mac 信息来配置本地的 OVS 和容器网卡,完成整个工作流。其他的 Service、NetworkPolicy 的流程也是和这个类似的。
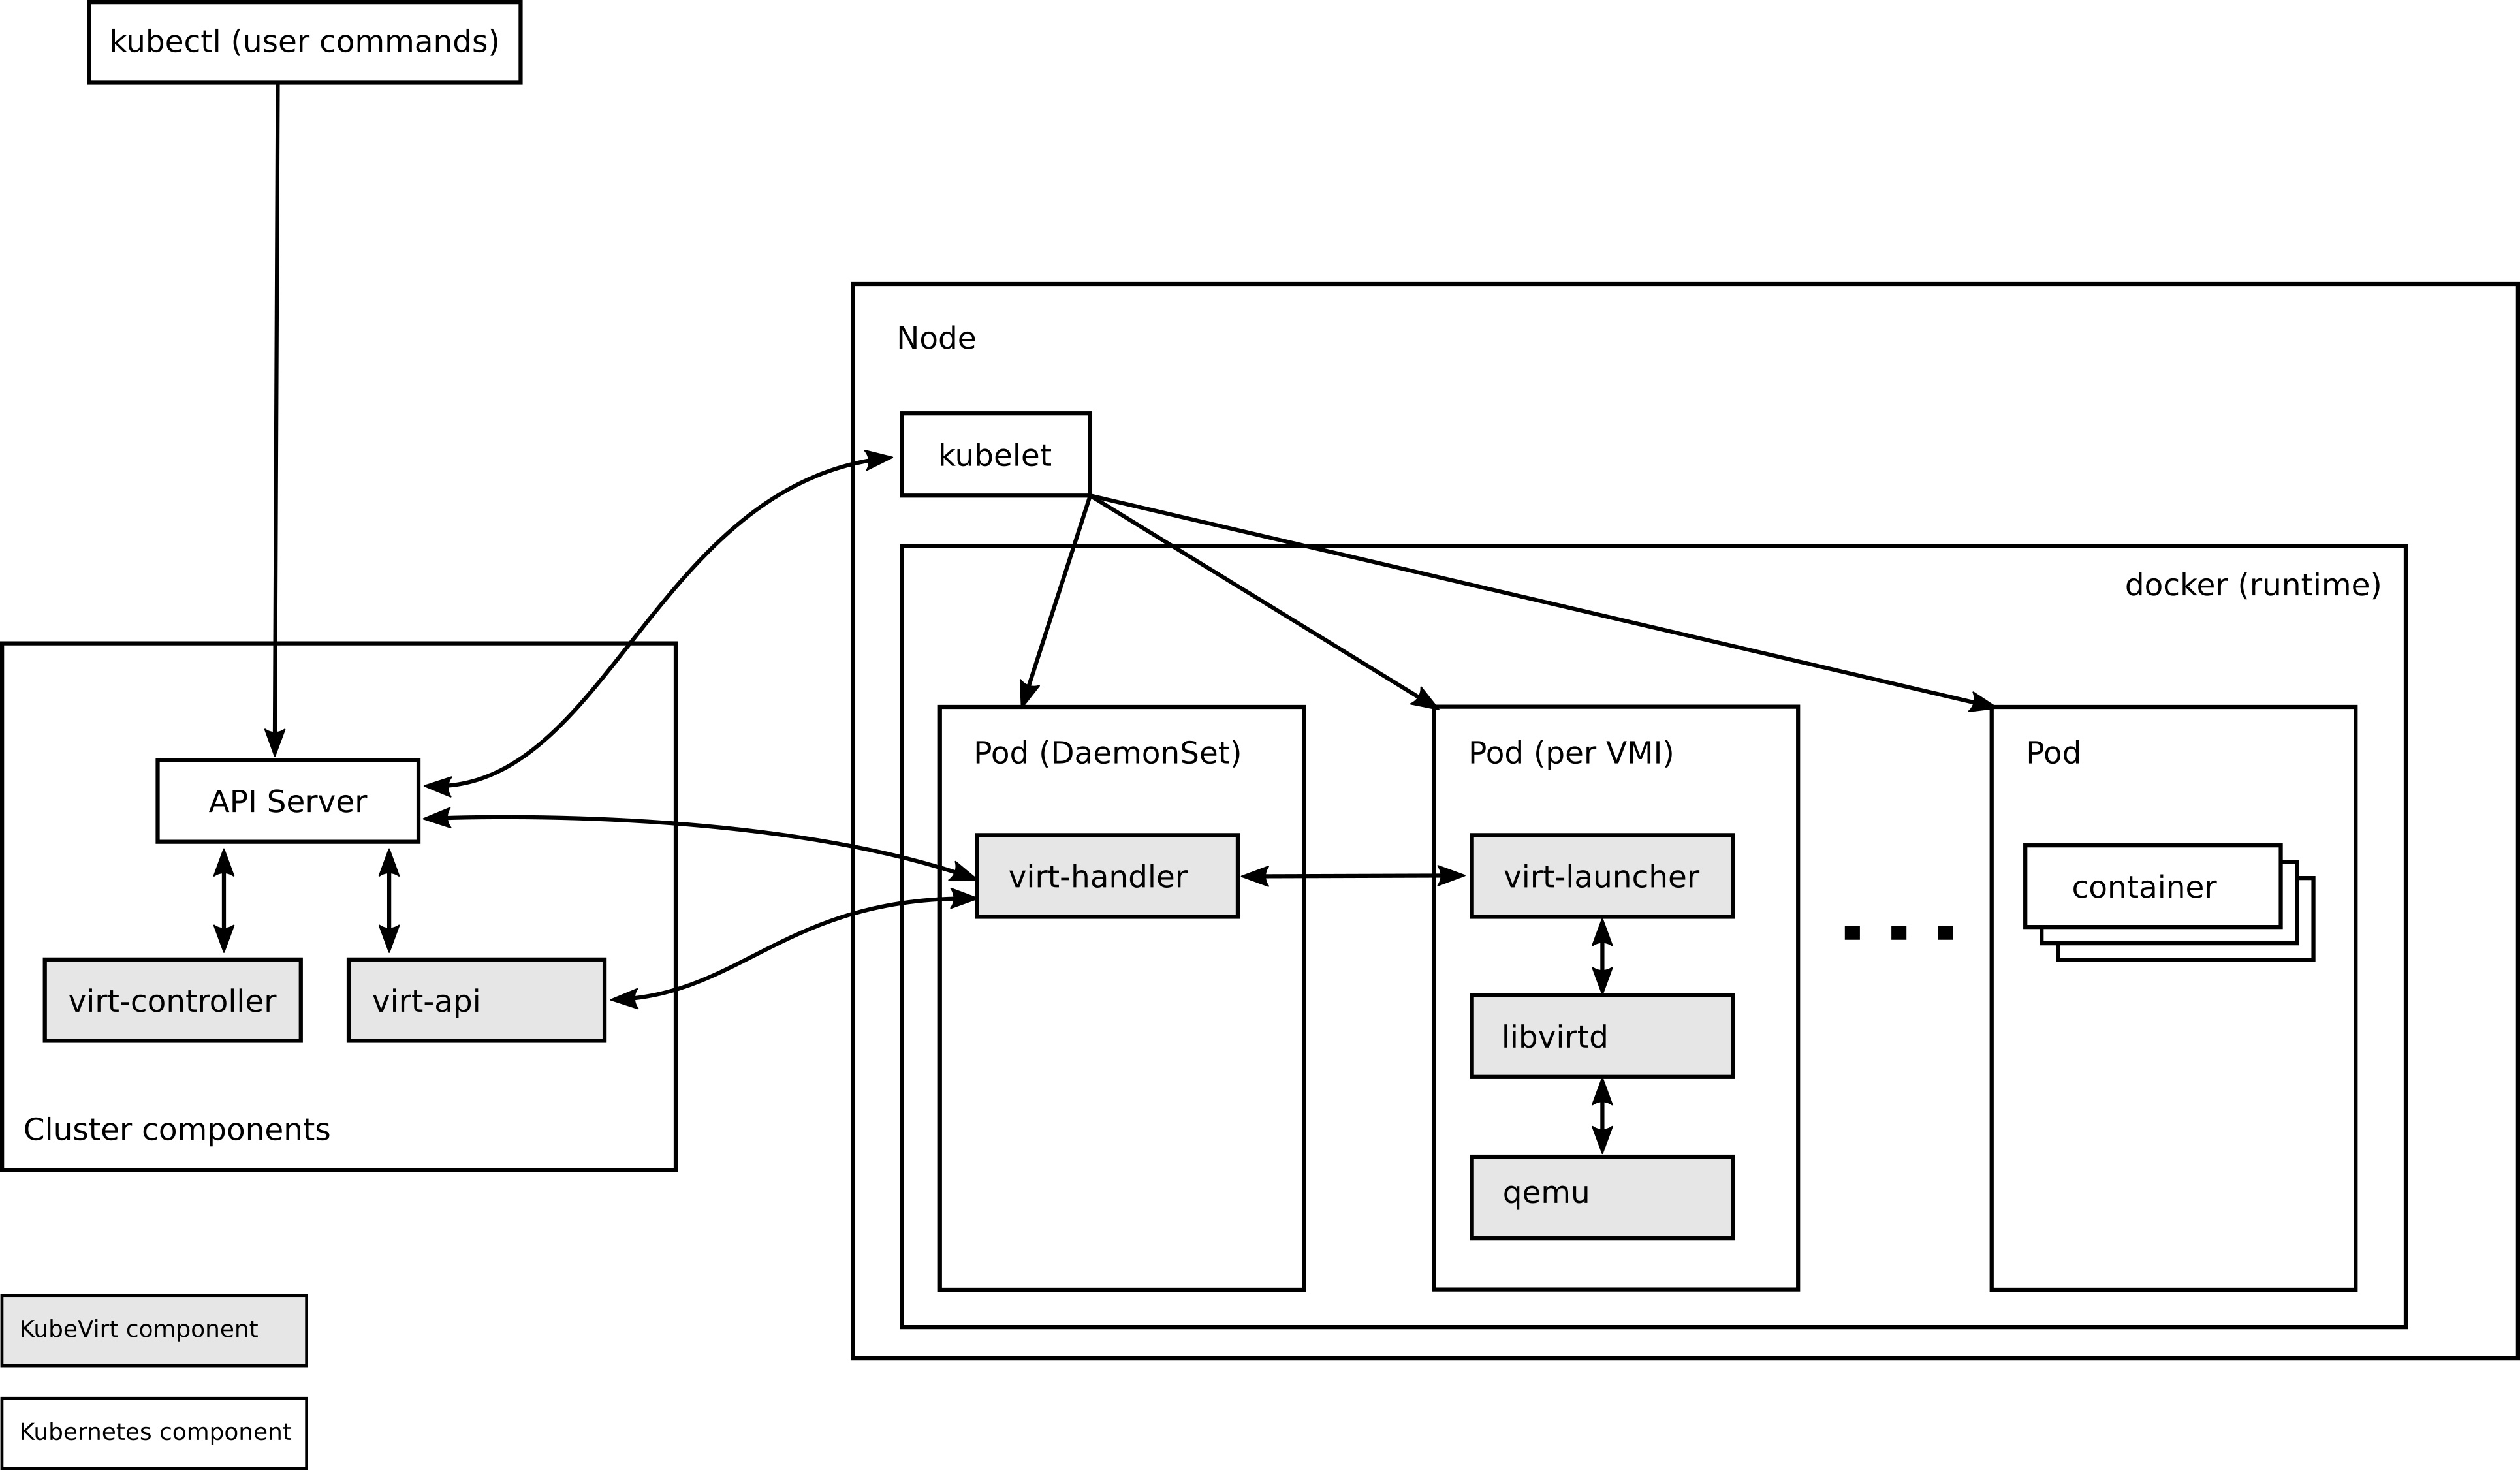
10.2 kubevirt架构 10.2.1 virt-operator 通过kubevirt operator安装kubevirt相关组件,选择指定版本。
10.2.2 virt-api 提供 HTTP RESTful 接口来管理集群内的虚拟机和虚拟机相关的工作流,负责更新虚拟化 CRD,也负责 VMI CRD 的默认设置和验证。它是一个集群级别的组件。
10.2.3 virt-controller 负责集群范围的虚拟化功能,管理与 VMI 关联的 Pod 的生命周期。它是一个集群级别的组件。
10.2.4 virt-handler 在各个节点上运行的 DaemonSet 资源,用于监控 VM 对象的更改,以及执行必要的操作来达到所需状态。
10.2.5 virt-launcher VMI 相关的 Pod 中包含了一个 virt-launcher 组件,用于提供 CGroup 和命名空间来托管 VMI 进程,当 VM CRD 对象通过 virt-handler 组件传递给 virt-launcher 时,将使用 Pod 中的 libvirtd 容器来启动 VMI,virt-launcher 将监控 VMI 进程,直至 VMI 终止时退出。
需要注意的是,后续附加的磁盘也是运行的virt-launcher。
10.3 cdi 10.3.1 cdi-operator 负责创建cdi。
10.3.2 cdi-uploadproxy 负责创建从本地导入的dataVolume。
10.3.3 cdi-deployment 包含CDI Controller ,负责创建dataVolume,当导入时会创建一个Data Import Pod。
10.3.4 cdi-apiserver 提供外部访问的接口。
11. 其他 11.1 cloud-init日志 1 2 3 4 5 6 7 8 9 10 11 12 13 14 15 # log 文件# /var/log/cloud-init-output.log: Captures the output from each stage of cloud-init when it runs. # /var/log/cloud-init.log: Very detailed log with debugging output, describing each action taken. # Early boot log # /run/cloud-init/cloud-init-generator.log: On systemd systems, this log file describes early boot enablement of cloud-init via the systemd generator. These logs are most useful if trying to figure out why cloud-init did not run. # /run/cloud-init/ds-identify.log: Contains logs about platform / datasource detection. These logs are most useful if cloud-init did not identify the correct datasource (cloud) to run on. # 配置文件 /etc/cloud/cloud.cfg /etc/cloud/cloud.cfg.d/*.cfg
12. 使用方法 12.1 虚拟机生命周期管理 部署虚拟机
1 helm install ubuntu-vm-2204-test ~/Softwares/k8s-help-tools/vm/myubuntu --set software.ubuntuVersion=jammy --set software.desktop.enabled=false --set software.sshConfig.enabled=true --set hardware.storage=40Gi --set hardware.memory=8192M
删除虚拟机
更新虚拟机配置(注意,如果要更新磁盘大小,那么storageclass必须支持扩容功能,否则可以通过挂载新的磁盘到虚拟机来扩充容量)
1 helm uograde ubuntu-vm-2204-test ~/Softwares/k8s-help-tools/vm/myubuntu --set hardware.memory=81920M
12.2 虚拟机管理 查看所有虚拟机
查看运行中的虚拟机实例
启动虚拟机
关闭虚拟机
重启虚拟机
通过串口连接虚拟机
通过vnc连接虚拟机
通过ssh连接虚拟机(-XY允许转发显示器)
任何该IP的端口均可访问,外部访问只需要进行转发即可
1 ssh -CfNg -L 3334:10.244.0.17:31970 ethereal@Ethereal-Desktop
配置ssh文件以便于直接通过vscode连接
以下为多跳配置,通过Jumper->Ethereal-Desktop->server-VM-ubuntu-remote
1 2 3 4 5 6 7 8 9 10 11 12 13 14 15 16 17 Host jumper HostName 202.120 .40 .82 User vyatta Host Ethereal-Desktop HostName Ethereal-Desktop ProxyJump jumper User ethereal ForwardX11 yes ForwardX11Trusted yes Host server-VM-ubuntu-remote HostName 10.244 .0 .3 ProxyJump Ethereal-Desktop User ethereal ForwardX11 yes ForwardX11Trusted yes
13. 扩容 13.1 前提 已经开启特性门控,且具备支持扩容的storageclass
13.2 扩容
直接修改pvc
重启虚拟机
进入虚拟机,使用gparted扩容
1 2 sudo apt install gparted gparted
参考 Kubernetes Kubevirt |使用Kubevirt创建虚拟机-CSDN博客
手把手教你从零部署一套 KubeVirt 最新版 1.2.1-CSDN博客
Installation - KubeVirt user guide
KubeVirt使用CDI来导入虚拟机镜像 - 皓然小站
NoCloud - cloud-init 24.3.1 documentation
使用Ubuntu Cloud Image快速初始化虚拟机,生成cloud-init配置文件_ubuntu cloud-init-CSDN博客
2.25. 使用 DataVolume 将虚拟机镜像导入到块存储 | Red Hat Product Documentation
containerized-data-importer/doc/datavolumes.md at main · kubevirt/containerized-data-importer
2.3. 使用 DataVolume 导入虚拟机镜像 | Red Hat Product Documentation
Ubuntu Cloud Images - the official Ubuntu images for public clouds, Openstack, KVM and LXD
Creating data volumes - Virtual machines | OpenShift Virtualization | OpenShift Container Platform 4.8
Create an Ubuntu VM — StarlingX documentation
containerized-data-importer/doc/waitforfirstconsumer-storage-handling.md at main · kubevirt/containerized-data-importer
Run commands during boot - cloud-init 24.3.1 documentation
4.7. 使用 cloud-init 运行第一个引导命令 | Red Hat Product Documentation
cloud-init学习笔记 | xixiliguo
如何在 Ubuntu 服务器上安装桌面环境(GUI) | Linux 中国 - 知乎
non-interactive install of lightdm - Debian User Forums
Networking Config Version 1 — Cloud-Init 17.1 documentation
IP is empty in restored VM because of MAC address conflict · Issue #11113 · kubevirt/kubevirt
ubuntu2204重启一直卡在host and Network Name Lookups的解决办法 - 运维术(未授权)
Ubuntu 网卡启动及配置_ubuntu配置网卡-CSDN博客
Startup Scripts - KubeVirt user guide
Use Cloud-Init to Write to a File | Linode Docs
Secret | Kubernetes
k8s学习-Secret(创建、使用、更新、删除等)_kubectl delete secret-CSDN博客
KubeVirt 05:为 VM 在线增加硬盘 – 小菜园
Hotplug Volumes - KubeVirt user guide
CPU Hotplug - KubeVirt user guide
Memory Hotplug - KubeVirt user guide
Ubuntu Manpage: virt-sysprep - Reset, unconfigure or customize a virtual machine so clones can be made
虚拟机 img 镜像密码修改-腾讯云开发者社区-腾讯云
Log and configuration files - cloud-init 25.1.1 documentation
一键安装 - Kube-OVN 文档
从0开始装一套 KubeVirt 1.2.1 - david_cloud - 博客园
k8s系列15-calico有损迁移至cilium - TinyChen’s Studio - 互联网技术学习工作经验分享
K8s Calico替换为Cilium,以及安装Cilium过程(鲁莽版)_flannel改用cilium-CSDN博客
【kubernetes/k8s概念】kube-ovn架构和部署安装_kube-ovn安装-CSDN博客
安装和配置选项 - Kube-OVN 文档
kubeovn/kube-ovn: A Bridge between SDN and Cloud Native (Project under CNCF)
固定 VM IP - Kube-OVN 文档
k8s更换网络插件:从flannel更换成calico - 哈喽哈喽111111 - 博客园
【K8s】Kubernetes 集群IP地址变更,全网最简单的修改方法-腾讯云开发者社区-腾讯云
网络插件 Cilium 更换 Calico-CSDN博客
CNI插件完全卸载指南(Flannel、Calico、Cilium) - Elijah’s Blog
完全卸载使用 Helm 安装的 Cilium | Nólëbase
Integration with Cilium replace kube-proxy + update docs for latest cilium version · Issue #3908 · kubeovn/kube-ovn
一键安装 - Kube-OVN 文档
Cilium 集成 - Kube-OVN 文档
IP Address Management (IPAM) — Cilium 1.17.2 documentation
AWS VPC CNI plugin — Cilium 1.17.2 documentation
kubectl 插件使用 - Kube-OVN 文档
总体架构 - Kube-OVN 文档
ovs-ovn介绍 - 知乎
再谈自研开源Kube-OVN, 设计思路及实现原理-腾讯云开发者社区-腾讯云
KubeVirt的使用 | kubernetes-notes
Kubevirt operator 初始化流程分析 | My way, the end is…
KubeVirt 01:KuberVirt 架构 – 小菜园
kubevirt(二)实现原理-CSDN博客
containerized-data-importer/doc/design.md at main · kubevirt/containerized-data-importer
KubeVirt 04:容器化数据导入 – 小菜园
VMware虚拟机使用宿主机GPU简化技术指南_vmware添加显卡-CSDN博客
KubeVirt KVM Real-Time 原理 · 风与云原生
QEMU搭建X86_64 + Ubuntu虚拟系统环境_ubuntu qemu-CSDN博客
QEMU 指南:如何以最快、最简单的方式创建和启动虚拟机
如何扩大或缩小现有的Linux分区? - 小小教程
Linux下磁盘扩容与挂载 - 小白不怕黑 - 博客园
Linux系统下IMG文件恢复与修复实用技巧探讨 - OSCHINA - 中文开源技术交流社区
Ubuntu命令行下缩小磁盘镜像img文件尺寸 - Milton - 博客园
(13 封私信 / 80 条消息) 一步搞定:详解Linux磁盘分区扩容方法 - 知乎
挂载并修改img镜像的分区文件 - 代码先锋网
挂载并修改img镜像的分区文件_怎么修改镜像主分区文件-CSDN博客
(24 封私信 / 81 条消息) Windows 11/Tiny 11精简版系统下载与安装(含23H2) - 知乎
推荐几个Windows iso镜像下载的网站_windows镜像下载网站-CSDN博客
quay.io/kubevirt/virtio-container-disk:20241121_a95b4f95ec - 镜像下载 | quay.io
(24 封私信 / 81 条消息) Kubevirt创建windows虚拟机 - 知乎
KubeVirt: installing Microsoft Windows 11 from an ISO | KubeVirt.io
Containerized Data Importer - KubeVirt user guide
2.21. 使用 virtctl 工具上传本地磁盘镜像 | 容器原生虚拟化 | OpenShift Container Platform | 4.2 | Red Hat Documentation
containerized-data-importer/doc/datavolumes.md at main · kubevirt/containerized-data-importer
failed to provision volume with StorageClass “local-storage”: configuration error, no node was specified · Issue #332 · rancher/local-path-provisioner
封装一个专属自己的Windows 系统 - cherry
(24 封私信 / 81 条消息) 定制属于你的 Windows 镜像 - 超详细的 Windows 镜像封装教程 - 知乎