vllm reading
1. 代码梳理
1.1 逻辑
1.1.1 初始化
初始化模型: __init__(vllm/engine/llm_engine.py): executor_class(vllm_config=vllm_config, )【根据配置加载executor】->_init_executor(vllm/executor/cpu_executor.py): self.driver_worker = self._create_worker()【创建driver worker进程】; self._run_workers(“load_model”)【调用worker进程加载模型】->__init__(vllm/worker/cpu_worker.py): ModelRunnerClass(…)【根据配置创建modelRunner】->load_model(vllm/worker/cpu_model_runner.py):get_model()【加载模型】->get_model(vllm/model_executor/model_loader/__init__.py):get_model_loader()【找到对应的模型加载类】;get_model_architecture(model_config)[0]->ModelRegistry.resolve_model_cls(architectures)->BartForConditionalGeneration(vllm/model_executor/models/bart.py)
初始化kv_cache: __init__(vllm/engine/llm_engine.py):
determine_num_available_blocks()->self.driver_method_invoker(self.driver_worker,”determine_num_available_blocks”)->determine_num_available_blocks()
_initialize_kv_caches()->initialize_cache(vllm/executor/cpu_executor.py)->initialize_cache(vllm/worker/cpu_worker.py):_validate_num_cpu_blocks(); _init_cache_engine()->
初始化调度器: __init__(vllm/engine/llm_engine.py): self.scheduler = …->
初始化输出器: __init__(vllm/engine/llm_engine.py): SequenceGroupOutputProcessor.create_output_processor
初始化分布式计算:__init__(vllm/engine/llm_engine.py): _init_executor(vllm/executor/cpu_executor.py)->init_device(vllm/worker/cpu_worker.py)->init_distributed_environment(vllm/worker/cpu_worker.py)->ensure_model_parallel_initialized(vllm/distributed/parallel_state.py)->initialize_model_parallel(vllm/distributed/parallel_state.py)->init_model_parallel_group(vllm/distributed/parallel_state.py)
1.1.2 调度运行
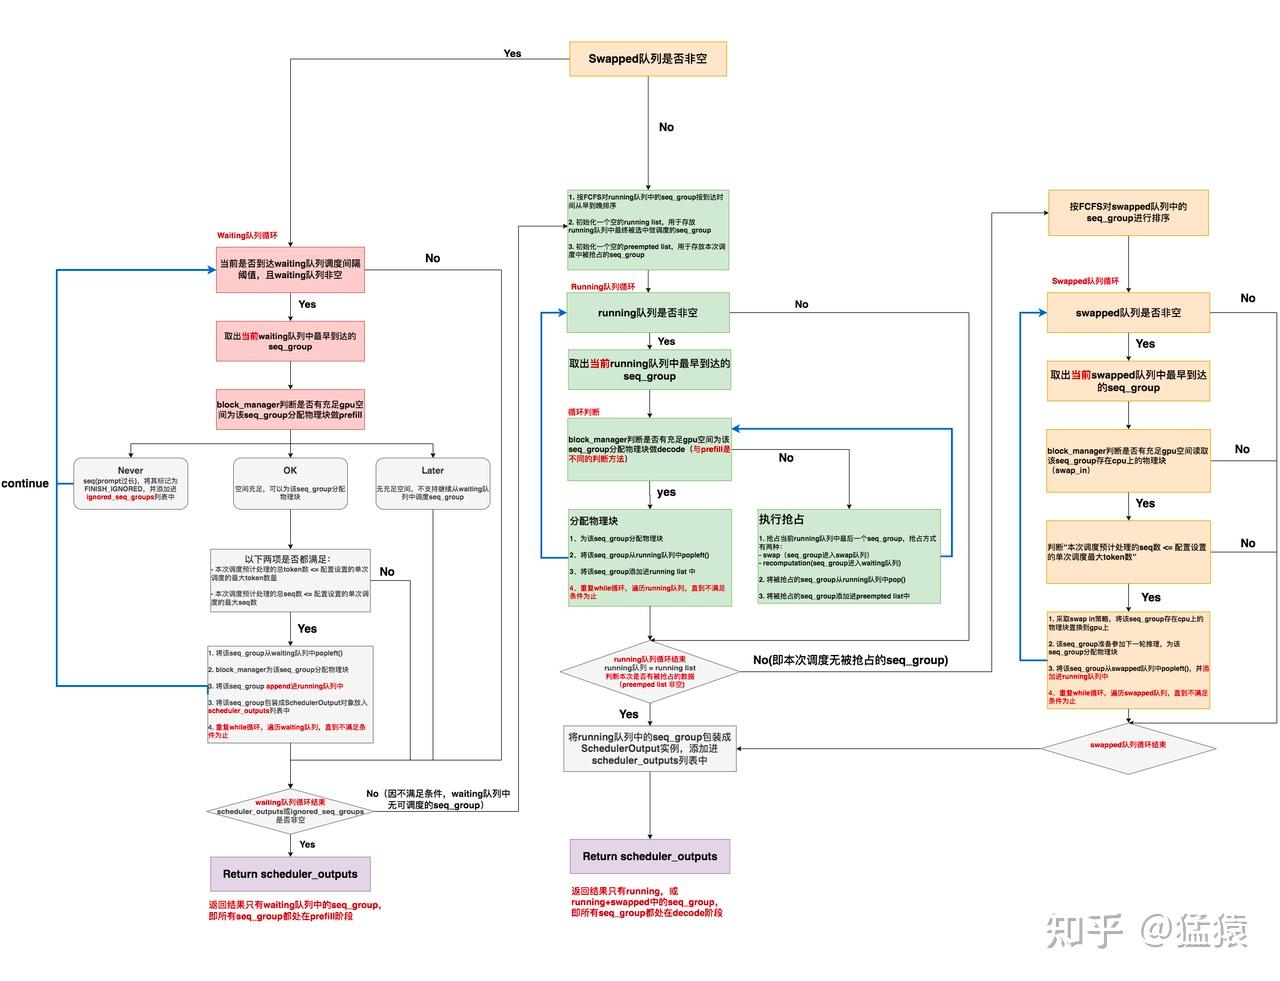
step(vllm/engine/llm_engine.py)->schedule(vllm/core/scheduler.py)->默认调度策略

1.1.3 kv cache运行
1.1.3.1 模型参数
->step(vllm/engine/llm_engine.py)
GPU: [->execute_model(vllm/executor/gpu_executor.py)
->execute_model(vllm/worker/worker_base.py)
->prepare_input(vllm/worker/worker_base.py)
->_get_driver_input_and_broadcast(vllm/worker/multi_step_worker.py)
->prepare_model_input(vllm/worker/multi_step_model_runner.py)
->prepare_model_input(vllm/worker/model_runner.py)
->_prepare_model_input_tensors(vllm/worker/model_runner.py) <核心:加载tensor>
->build(vllm/worker/model_runner.py)]
CPU: [->execute_model(vllm/executor/cpu_executor.py)
->execute_model(vllm/worker/worker_base.py)
->prepare_input(vllm/worker/worker_base.py)
->_get_driver_input_and_broadcast(vllm/worker/worker_base.py)
->prepare_model_input(vllm/worker/cpu_model_runner.py)
->_prepare_model_input_tensors(vllm/worker/cpu_model_runner.py)
->build(vllm/worker/cpu_model_runner.py)]
1.1.3.2 kvcache
取出:
->step(vllm/engine/llm_engine.py)
ALL: [->execute_model(vllm/executor/gpu_executor.py)
->execute_model(vllm/worker/worker_base.py)
->recv_tensor_dict(vllm/distributed/parallel_state.py)
->torch.distributed.recv(vllm/distributed/parallel_state.py)]
放回:
->step(vllm/engine/llm_engine.py)
ALL: [->execute_model(vllm/executor/gpu_executor.py)
->execute_model(vllm/worker/worker_base.py)
->send_tensor_dict(vllm/distributed/parallel_state.py)
->torch.distributed.send(vllm/distributed/parallel_state.py)]
1.2 新增内容
本项目基于 vLLM 设计并构建了一个支持 Prefill 和 Decode 动态拆分合并的推理引擎系统。现有的 PD 分离架构侧重于满足时延要求(TTFT、TBT)要求,但资源利用率和吞吐量低;而 PD 混合架构有较高资源利用率,但Prefill和Decode请求间的干扰可能导致时延无法满足。因此我们在 PD 混合部署的基础上,允许 Prefill 和 Decode 请求通过动态拆分合并机制组成 batch,从而在保证资源利用率的同时尽可能满足时延要求。
为了实现上述目标,本项目需要实现两个模块:Prefill 和 Decode 性能建模模块以及调度模块。在给定的硬件和模型信息下,Prefill 和 Decode 性能建模模块负责建立大模型推理的性能模型,以预测 任意batch 的执行时间。调度模块则需要根据请求的 SLO 信息、当前工作负载以及性能模型的预测结果,调度请求的执行,以最大化有效吞吐量(goodput)。
Prefill和Decode性能建模模块
Prefill 和 Decode 性能建模模块负责为调度模块提供任意 batch 的执行时长预测结果。该模块通过分析 Prefill 和 Decode 的执行特性,并结合模型及硬件信息,提出了建模公式。该公式能够支持对包含任意 Prefill 和 Decode 请求的 batch 的执行时间进行预测。
考虑大语言模型的执行特性,参考DistServe对Prefill和Decode单独建模的方式,我们提出Prefill和Decode的混合建模,具体考虑了如下因素:
- $t$: batch中prefill请求的token的数量和。
- $t_{2} $: batch中prefill请求的token的数量平方和。
- $t_3$:batch中decode请求token的数量和。
- $B_d$:batch中decode请求的数量。
我们提出如下建模公式:$T_{batch} = C_1*(t + B_d) + C_2t_2 + C_3t_3 + C_4$。
在4090设备上基于vLLM测试meta-llama/Llama-3.2-3B模型时,我们发现上述建模公式还会受到如下因素影响:
- Tile Quantization:矩阵维度不能被GPU计算单元数整除,导致出现跳变现象。
- Attention串行计算:vLLM中使用了两个不同算子分别计算Prefill和Decode请求的Attention部分,因此需要分别考虑两部分Attention计算的时延。
- Swap开销:vLLM会将KV Cache在主存和显存间换入换出,有额外耗时。
考虑上述三个因素,我们完善后的建模公式如下:$T_{batch} = C_1*(t + B_d) + C_2t_2 + C_3t_3 + C_4((t + B_d + 63) / 64) + C_5* (B_d > 0) + C_6 * num_swap + C_7$。其中$C_n$为待拟合参数;$C_4$项与Tile Quantization相关;$C_5$项与Attention串行计算相关;$C_6$项与Swap开销相关且可以通过离线测试确定取值。
基于上述建模公式,利用离线测试得到的真实数据,可对公式中的参数进行拟合得到具体数值。在基于4090硬件对meta-llama/Llama-3.2-3B的实际测试中,建模预测结果与真实结果误差在5%内。
相关代码在modeling_submit分支:
- modeling/pd_mixed_fitting.py
- vllm/utils.py的RecordManager类
- vllm/engine/llm_engine.py的record_batch方法
调度模块
调度模块基于TTFT和TBT要求调度请求的执行,目标是最大化goodput。具体而言,调度模块会依据性能建模模块的预测结果,构建一个既不会违背最紧急请求SLO要求,又能尽可能最大化算力使用的batch,从而在保证时延的同时提升资源利用率。
请求的动态拆分合并
在 vLLM 中,请求分为三类:Decode 请求、Prefill 请求和 swapped 请求。在我们设计的请求动态拆分合并机制中,调度器不对这三种请求进行区分。每轮调度时,调度器会根据 SLO 的余量对这三类请求进行排序,SLO 余量越少的请求越紧急,优先级越高,将优先被调度。
每轮调度,调度器以当前最紧急请求的SLO余量作为当前batch的最大允许时间(batch_slo),同时会维护当前轮次已调度请求的信息(scheduled_batch)。在判断下一个请求是否能够在本轮被调度时,调度器会将当前请求加入scheduled_batch中,然后基于性能建模模块预测其执行时间。如果预测的执行时间小于batch_slo,则成功加入;否则,移除该请求,不在本轮调度。
Early reject机制
为了防止因执行某个过长的请求导致多个正在排队级联超时,我们引入了early reject机制。在判断是否应该调度某个请求时,我们会依据建模模块预测的执行时间,以及剩余待调度请求的SLO余量,计算如果调度当前请求会导致多少后续排队请求超时。如果会造成多个请求级联超时,则在本轮拒绝调度该请求。此外,每次调度时,调度器会扫描请求队列,并拒绝已经超时的请求。
主要代码在test_submit分支:
- vllm/core/scheduler.py
调度模块核心是_schedule_chunked_prefill_slo_aware:会不断加入scheduled_batch,直到发现条件不满足,选择踢掉prefill重试,直到没有prefill的任务,再执行
2. 部署
2.1 下载模型
可以使用ModelScope下载
1 | pip install modelscope |
下载路径为~/.cache/modelscope/hub/models/qwen/qwen2-0.5b
2.2 部署安装vllm
2.2.1 直接安装(只支持GPU)
1 | pip install vLLM |
2.2.2 源码安装
2.2.2.1 下载
1 | git clone git@github.com:vllm-project/vllm.git |
2.2.2.2 安装依赖
注意CMake版本有要求,可以参考ubuntu-toolchain-r-ubuntu-test工具链 - Ethereal’s Blog 更新
1 | sudo apt-get update -y |
2.2.2.3 安装或更新(更新直接再次运行即可)
基于CPU:
1 | VLLM_TARGET_DEVICE=cpu python setup.py install |
默认:
1 | python setup.py install |
2.2.3 使用
启动服务器:
1 | vllm serve ~/.cache/modelscope/hub/models/qwen/qwen2-0.5b |
测试:
1 | curl http://localhost:8000/v1/completions -H "Content-Type: application/json" -d '{ |
3. 相似工作(SGLang)
[2309.06180] Efficient Memory Management for Large Language Model Serving with PagedAttention
参考
图解大模型计算加速系列:vLLM源码解析1,整体架构 - 知乎
图解大模型计算加速系列:vLLM源码解析2,调度器策略(Scheduler) - 知乎
vllm/vllm/core/scheduler.py at main · vllm-project/vllm
[2309.06180] Efficient Memory Management for Large Language Model Serving with PagedAttention
vLLM CPU和GPU模式署和推理 Qwen2 等大语言模型详细教程 - 老牛啊 - 博客园
vllm-project/vllm: A high-throughput and memory-efficient inference and serving engine for LLMs
- Title: vllm reading
- Author: Ethereal
- Created at: 2025-04-01 14:21:35
- Updated at: 2025-06-07 14:07:18
- Link: https://ethereal-o.github.io/2025/04/01/vllm-reading/
- License: This work is licensed under CC BY-NC-SA 4.0.